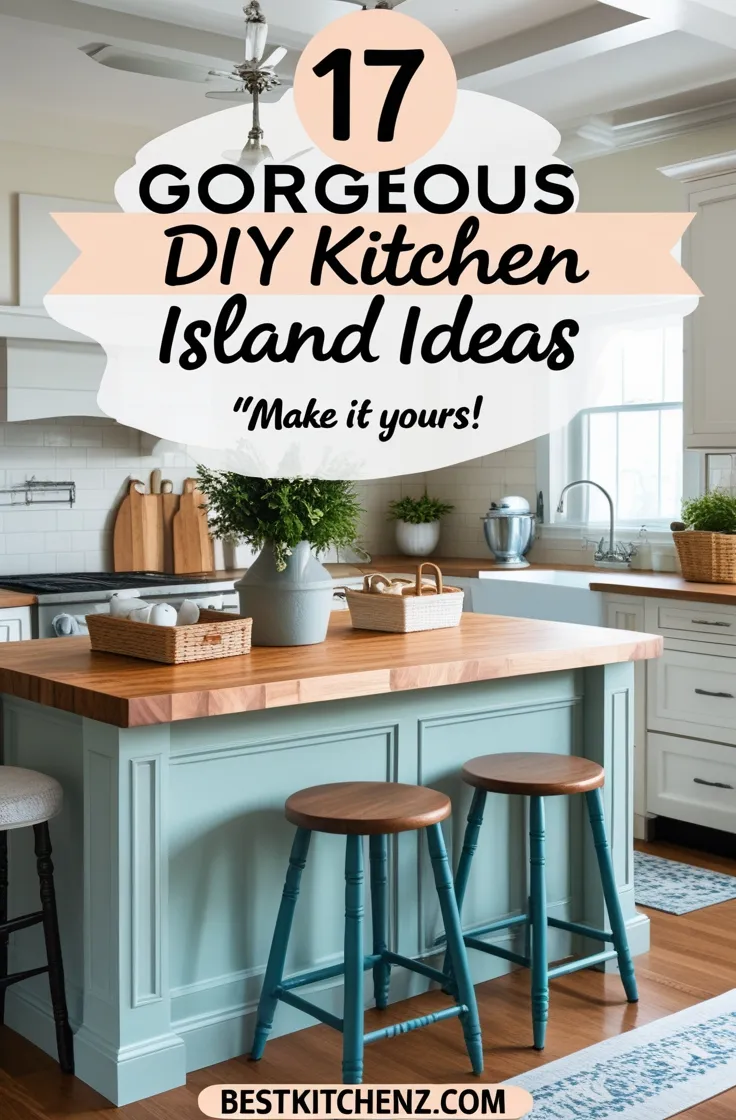
In this comprehensive guide, you’ll discover 17 incredible DIY kitchen island ideas that can revolutionize your cooking space without breaking the bank. From simple weekend projects to more ambitious builds, we’ve got options for every skill level and budget.
You’ll learn step-by-step instructions, cost breakdowns, and professional tips to make your DIY kitchen island project a success. By the end of this article, you’ll have all the inspiration and knowledge you need to create the perfect kitchen island for your home.
In This Article
- 1 1. Repurposed Dresser Island
- 2 2. Butcher Block Kitchen Island
- 3 3. Cube Storage Conversion Island
- 4 4. Rolling Cart Kitchen Island
- 5 5. Rustic Barn Door Style Island
- 6 6. Bookcase Conversion Island
- 7 7. Double-Sided Cabinet Island
- 8 8. Outdoor Kitchen Island
- 9 9. Beginner-Friendly Simple Island
- 10 10. Custom Built Island with Seating
- 11 11. Napa-Style Kitchen Island
- 12 12. Budget-Friendly Pallet Island
- 13 13. Appliance-Ready Island with Electrical
- 14 14. Sink-Equipped Functional Island
- 15 15. Multi-Level Work Surface Island
- 16 16. Slim Rolling Prep Station
- 17 17. Storage-Maximizing Island with Specialized Compartments
- 18 Practical Tips and Tricks for DIY Kitchen Islands
- 19 FAQ Section
- 19.1 How much does it cost to build a DIY kitchen island?
- 19.2 What is the standard size for a kitchen island?
- 19.3 Do I need special tools to build a kitchen island?
- 19.4 How much space should I leave around my kitchen island?
- 19.5 Can I add plumbing or electricity to my DIY island?
- 19.6 What countertop materials work best for DIY kitchen islands?
- 19.7 How tall should my kitchen island be?
- 20 Conclusion
1. Repurposed Dresser Island
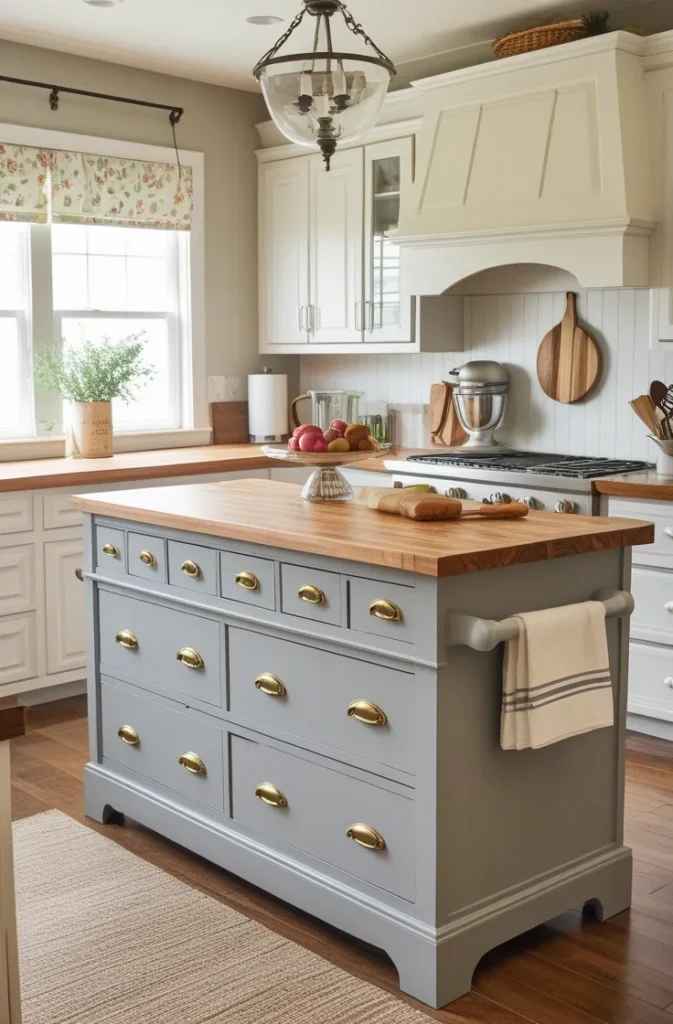
Transform an old dresser into a charming and functional kitchen island that adds character to your space. This project allows you to upcycle furniture while creating valuable kitchen real estate.
Look for a sturdy dresser with good bones at thrift stores or yard sales, then sand, prime, and paint it to match your kitchen décor. Replace the hardware with modern pulls and consider adding a butcher block or stone countertop to create a durable work surface.
The existing drawers provide excellent storage for utensils, linens, and kitchen gadgets, making this DIY kitchen island both practical and beautiful.
DIY How to: Remove the dresser’s top, sand all surfaces, prime and paint with kitchen-friendly paint, then secure your chosen countertop with construction adhesive or screws depending on the material.
Cost: $150-$400 depending on whether you already own the dresser and your choice of countertop material.
Pro Tip: Add casters to the bottom of your dresser island for mobility, allowing you to roll it out of the way when needed or lock it in place during use.
2. Butcher Block Kitchen Island
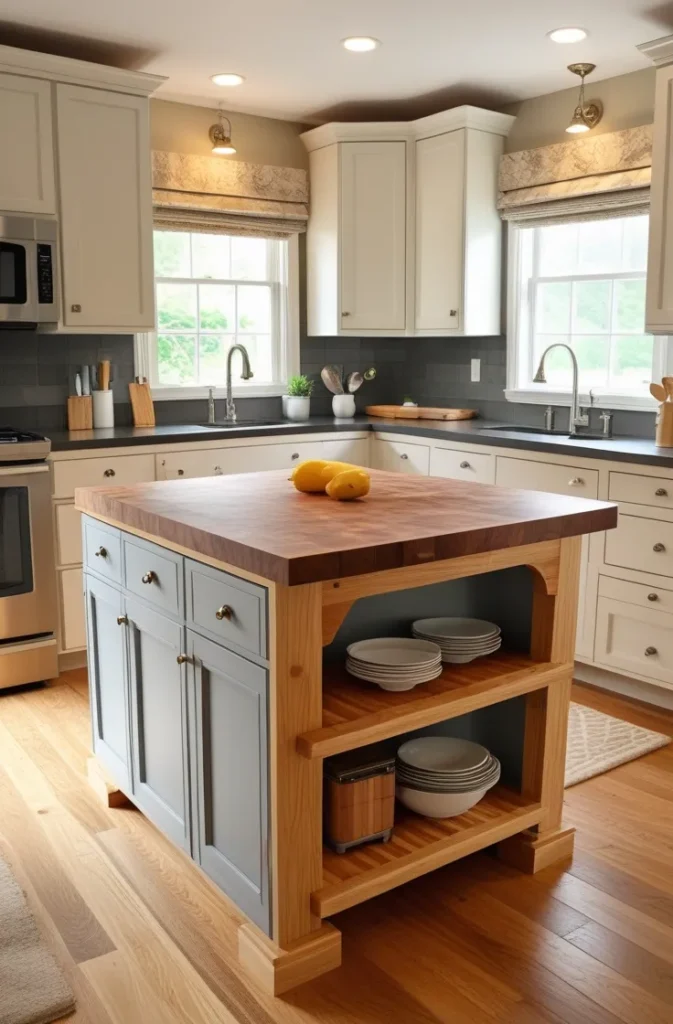
A butcher block kitchen island offers both beauty and functionality with its warm wood tones and food-prep-friendly surface.
This DIY kitchen island design features cabinets for storage, drawers for utensils, and a gorgeous butcher block top that serves as both a cutting surface and visual centerpiece.
The natural wood grain adds warmth to any kitchen while providing a durable work area that, with proper maintenance, will last for years. This design works particularly well in smaller kitchens where you need to maximize functionality without overwhelming the space.
DIY How to: Build a base frame with 2x4s, attach cabinet boxes, install drawers with slides, then secure and finish the butcher block top with food-safe oil.
Cost: $300-$800 depending on the size and whether you purchase pre-made cabinets or build them yourself.
Pro Tip: Oil your butcher block top monthly with food-grade mineral oil to prevent cracking and maintain its beauty, and always clean it promptly after preparing raw meat.
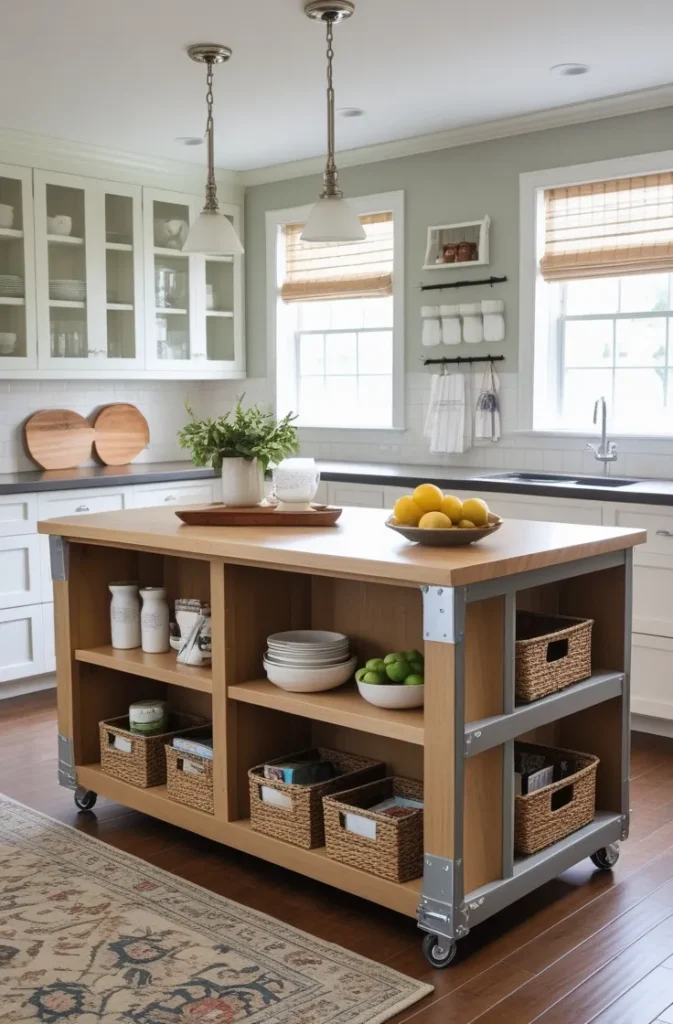
3. Cube Storage Conversion Island
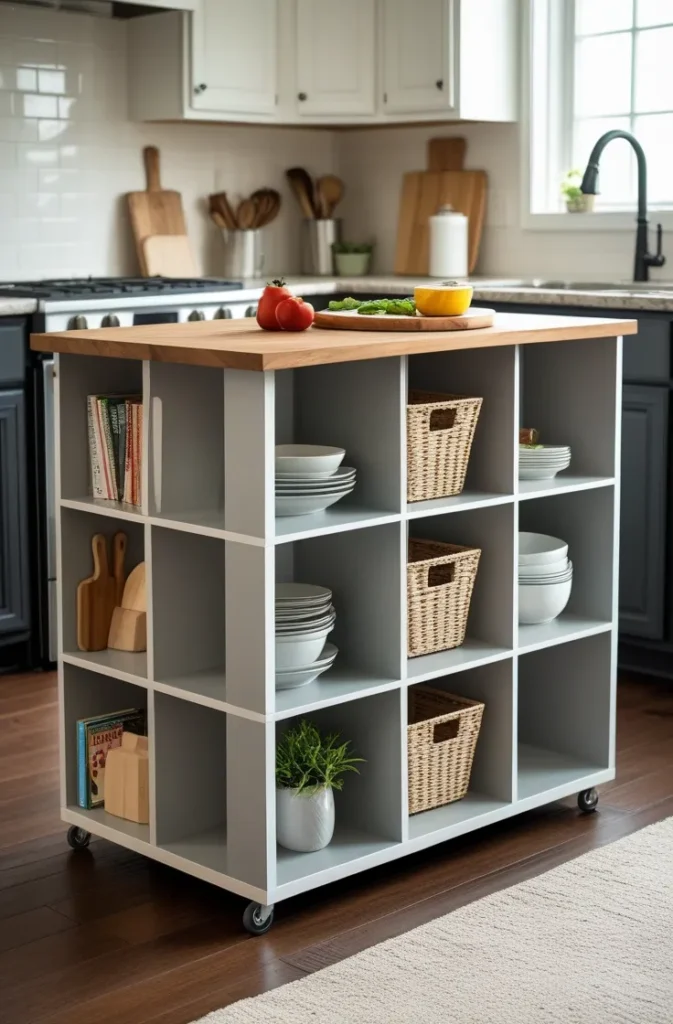
Create a versatile and budget-friendly DIY kitchen island by repurposing cube storage shelves. This clever approach transforms ordinary storage furniture into a functional kitchen workspace with ample storage for cookbooks, appliances, and kitchen tools. .
By flipping tall cube shelves on their sides and adding legs, you can create the perfect height for food preparation. Top it with a repurposed tabletop or new countertop material to complete the look.
The large cube compartments offer excellent storage for bulky items that might not fit in traditional cabinets.
DIY How to: Place two cube storage units side by side, secure them together, attach legs to raise to counter height, then add your chosen countertop and secure it with screws or adhesive.
Cost: $150-$300 depending on whether you purchase new cube shelves or repurpose existing ones.
Pro Tip: Add baskets to some of the cubes for storing smaller items while keeping them hidden, and use the remaining open cubes for displaying cookbooks or decorative kitchen items.
4. Rolling Cart Kitchen Island
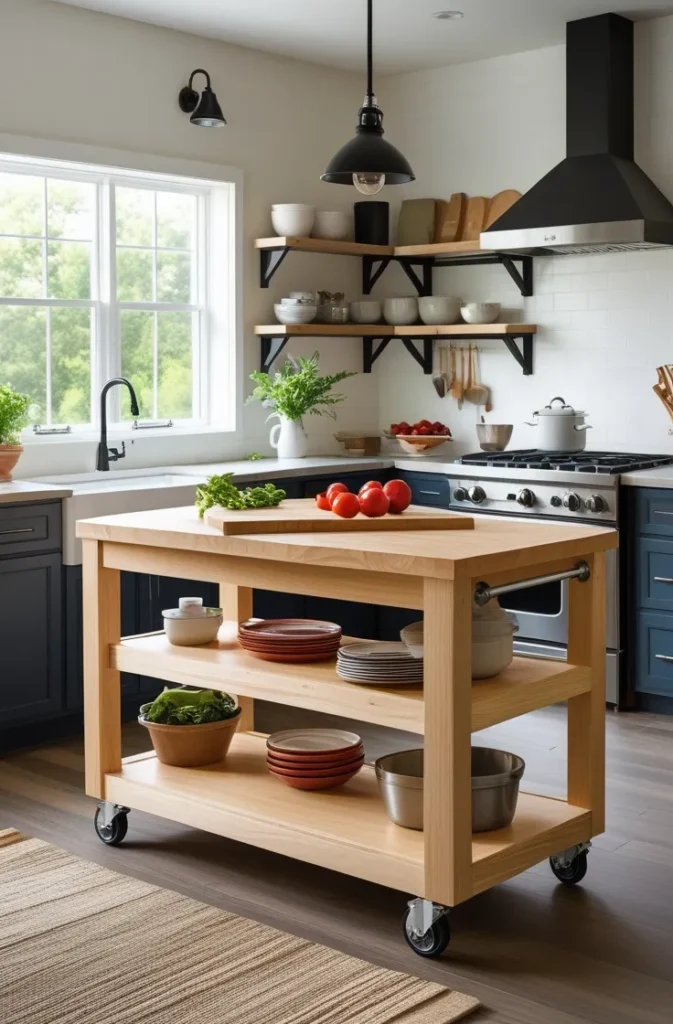
A rolling cart DIY kitchen island offers the ultimate in kitchen flexibility, allowing you to move your workspace wherever it’s needed. This mobile solution is perfect for smaller kitchens or for homeowners who aren’t ready to commit to a permanent installation.
With a price point starting around $100 for a DIY version, it’s also incredibly budget-friendly. Add shelves for storage, hooks for hanging utensils, and a durable top surface for food preparation.
The mobility factor makes this island ideal for entertaining, as you can roll it wherever extra counter space is needed.
DIY How to: Build a frame with 2x4s, add plywood shelves, attach heavy-duty locking casters, and top with your preferred countertop material.
Cost: $100-$300 depending on materials and size.
Pro Tip: Choose locking casters that can support at least 50 pounds each, and always lock them when using the island for food preparation to prevent unwanted movement.
5. Rustic Barn Door Style Island
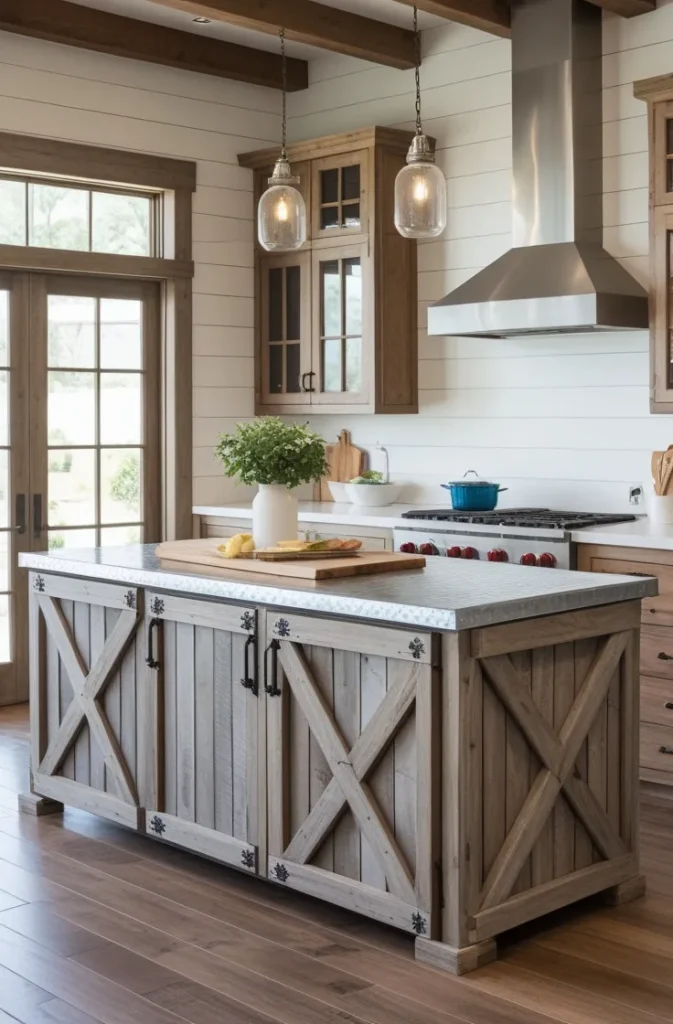
Create a statement piece with a rustic barn door style DIY kitchen island that brings farmhouse charm to your cooking space.
This design uses cedar planks arranged in a barn door pattern to transform an ordinary island into a custom, high-end furniture piece. The weathered gray stain adds to the rustic appeal, while a galvanized metal top provides a durable and easy-to-clean work surface.
Check Next: 15 Stunning Shiplap Kitchen Island Ideas To lift Your Space
10 Scandinavian Kitchen Island Ideas: Merging Minimalism with Practicality
This island style works particularly well in country, farmhouse, or industrial kitchen designs, adding warmth and character to the space.
DIY How to: Start with a basic island frame, attach cedar planks in a barn door pattern, stain with weathered gray finish, then top with a galvanized metal sheet secured with construction adhesive.
Cost: $400-$700 depending on the size and materials.
Pro Tip: Seal the wood with polyurethane after staining to protect it from kitchen spills and moisture, and apply a food-safe sealant to the metal top if you’ll be using it for food preparation.
6. Bookcase Conversion Island
Transform a bookcase into a functional DIY kitchen island that provides both storage and workspace. This clever upcycling project gives new life to an old bookcase while creating valuable kitchen real estate.
Choose a sturdy bookcase with adjustable shelves for maximum versatility, then reinforce it as needed for kitchen use. Add a countertop that extends slightly beyond the bookcase edges to create an overhang for seating.
The open shelving provides easy access to cookbooks, appliances, and decorative items, making this island both practical and visually appealing.
DIY How to: Reinforce the bookcase structure with corner brackets, attach a base with casters if desired, then secure your chosen countertop material to the top.
Cost: $200-$450 depending on whether you already own the bookcase and your choice of countertop.
Pro Tip: Install a towel bar on one end of your bookcase island for hanging kitchen towels, and use decorative baskets on the shelves to organize smaller items while adding visual interest.
7. Double-Sided Cabinet Island
A double-sided cabinet DIY kitchen island maximizes storage while creating a substantial workspace in your kitchen.
This design features cabinets accessible from both sides, making it perfect for kitchens where the island serves as a divider between cooking and dining areas.
With push-through drawers and multiple storage shelves, this island style offers exceptional organization options for all your kitchen essentials. Available in both large (60″ x 28″) and smaller (48″ x 29.5″) versions, this versatile design can be adapted to fit kitchens of various sizes.
DIY How to: Build a frame with 2x4s, construct and attach cabinet boxes on both sides, install drawers with slides, then add your preferred countertop.
Cost: $600-$1,200 depending on size and materials.
Pro Tip: Consider installing electrical outlets on one side of your island for small appliances, but be sure to consult with an electrician about proper installation and permits.
8. Outdoor Kitchen Island
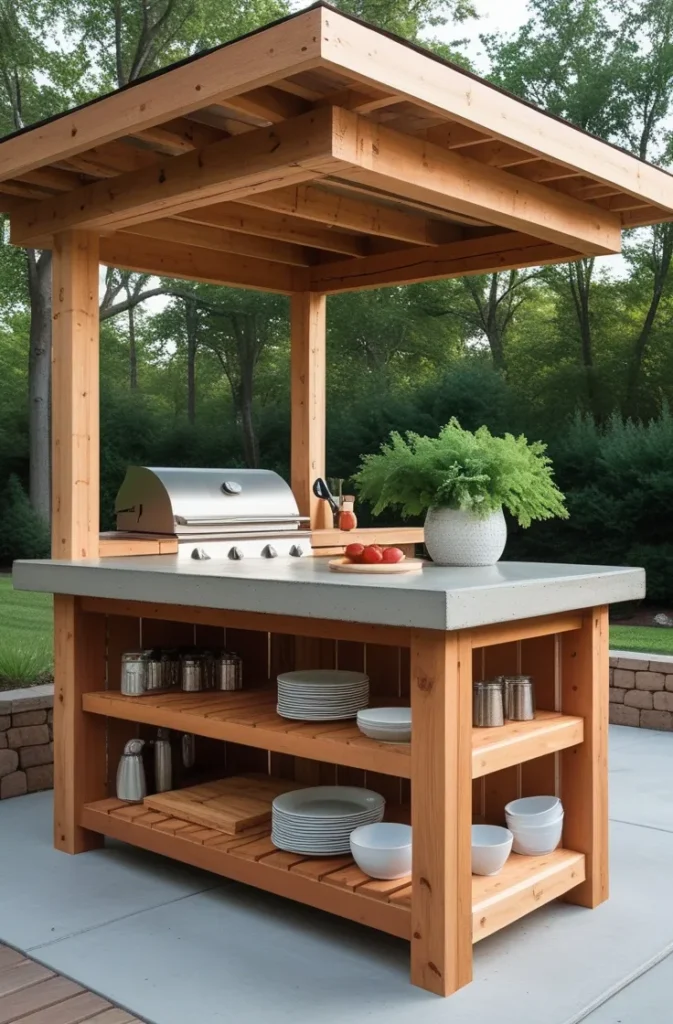
Extend your cooking space to the great outdoors with a weatherproof DIY kitchen island designed specifically for outdoor use.
Built with cedar lumber and topped with a durable concrete surface, this island can withstand the elements while providing valuable prep space for your outdoor cooking adventures.
The open design allows for storage of grilling tools and outdoor dining essentials, while the concrete top offers a heat-resistant surface for setting hot dishes from the grill. This project is perfect for enhancing your outdoor entertaining space.
DIY How to: Construct a frame with pressure-treated or cedar lumber, build open shelving, then create and pour a concrete countertop with proper reinforcement.
Cost: $300-$600 depending on size and materials.
Pro Tip: Apply a concrete sealer to the countertop every six months to prevent staining and extend its lifespan, and consider adding hooks to the sides for hanging grilling tools.
9. Beginner-Friendly Simple Island
Even novice woodworkers can tackle this simple DIY kitchen island that doesn’t sacrifice functionality for ease of construction. This design includes practical features like drawers, a pullout waste bin, drop-leaf top for extra space when needed, and open shelving for storage.
The straightforward construction makes it an ideal first furniture project, while the finished product looks professionally crafted.
The downloadable plans include detailed blueprints, 3D animations, and step-by-step instructions to guide you through every phase of the build.
DIY How to: Follow the downloadable plans to cut lumber according to the cut list, assemble the frame, attach shelves, install drawer slides and waste bin pullout, then secure the countertop.
Cost: $250-$500 depending on materials and features.
Pro Tip: Take your time with drawer installation to ensure smooth operation-measure twice, cut once, and test the fit before final assembly to avoid frustration later.
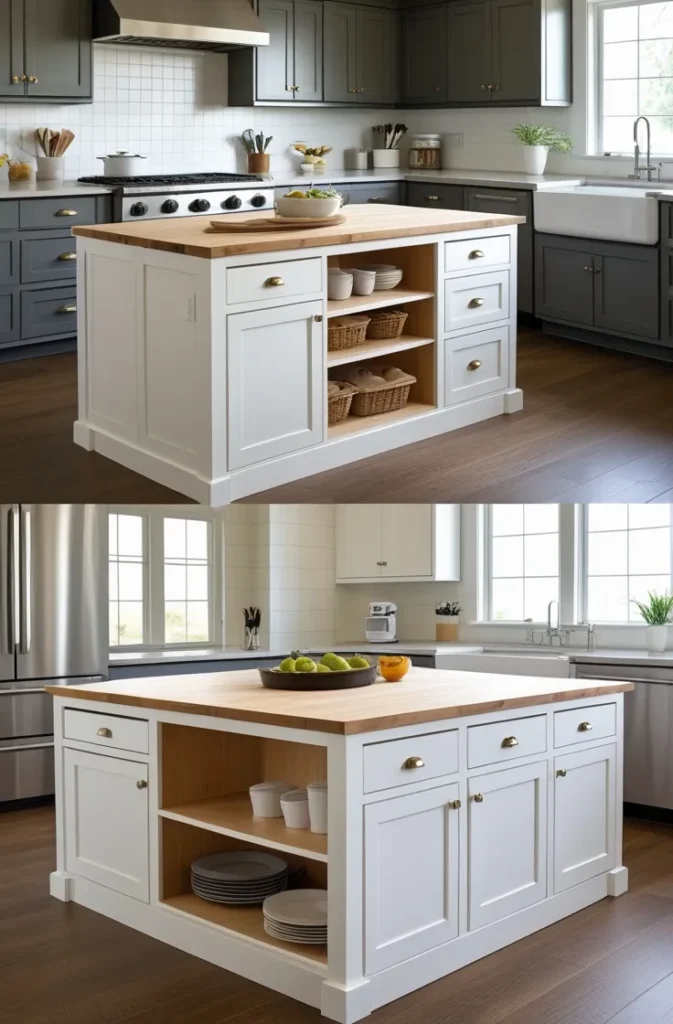
10. Custom Built Island with Seating
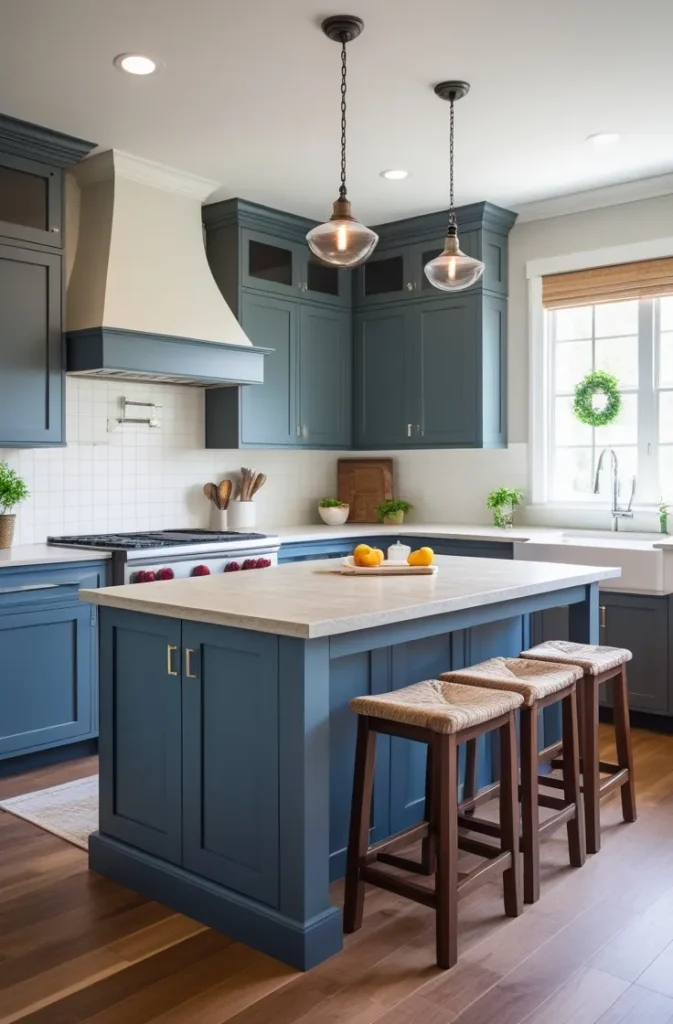
Create a gathering place in your kitchen with a custom-built DIY kitchen island that incorporates seating.
This design features an extended countertop that creates an overhang for bar stools, transforming your island into a casual dining area or homework station.
With cabinets on one side and open space for seating on the other, this island maximizes functionality while encouraging social interaction in the kitchen. The custom nature allows you to tailor the dimensions to your specific space, whether you need seating for two or four people.
DIY How to: Build a cabinet base, extend the countertop on one side to create an overhang (typically 12″ for comfortable seating), ensure proper support for the overhang, then finish with your preferred countertop material.
Cost: $600-$1,500 depending on size, materials, and number of cabinets.
Pro Tip: The standard countertop height is 36″, but consider a 42″ bar-height counter for a more dramatic look-just be sure to purchase appropriately sized stools for comfortable seating.
11. Napa-Style Kitchen Island
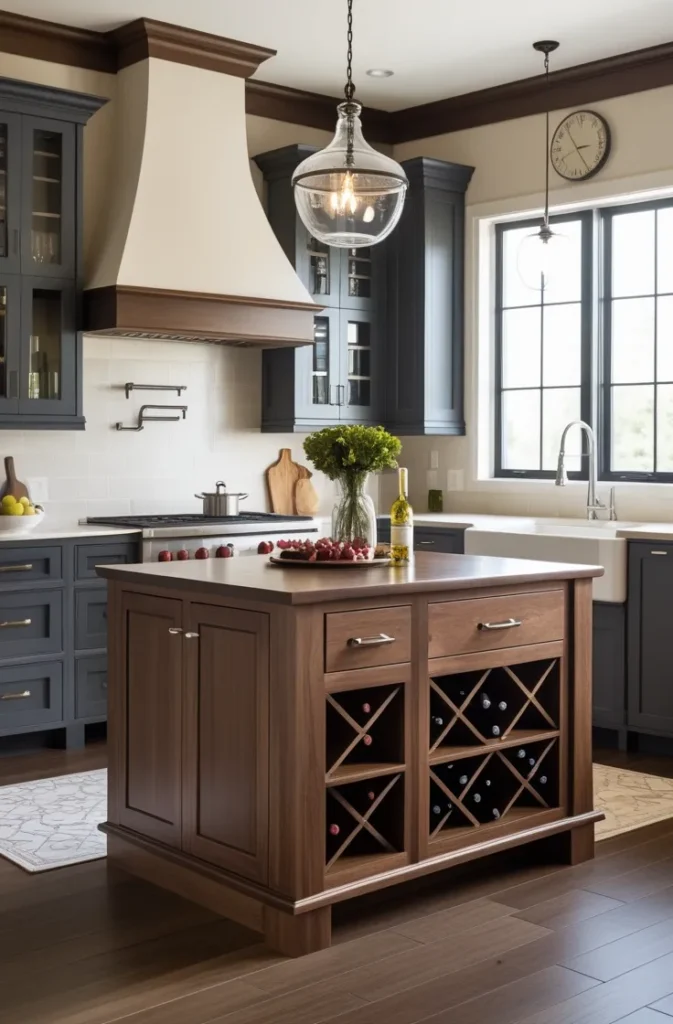
Bring wine country elegance to your kitchen with a Napa-style DIY kitchen island that combines beauty and functionality.
This sophisticated design features a combination of closed cabinets and open shelving, creating display space for wine bottles or decorative items while keeping essentials hidden away.
Available in both large (60″ x 28″) and smaller (48″ x 29.5″) versions, this versatile island can be adapted to kitchens of various sizes. The push-through drawer adds convenience, allowing access from either side of the island.
DIY How to: Follow the free plans from Designs by Studio C, constructing the frame, building cabinets and shelves, installing the push-through drawer, then topping with your chosen countertop material.
Cost: $500-$900 depending on size and materials.
Pro Tip: Install wine glass holders underneath one section of the countertop overhang to maximize functionality and enhance the wine country aesthetic.
12. Budget-Friendly Pallet Island
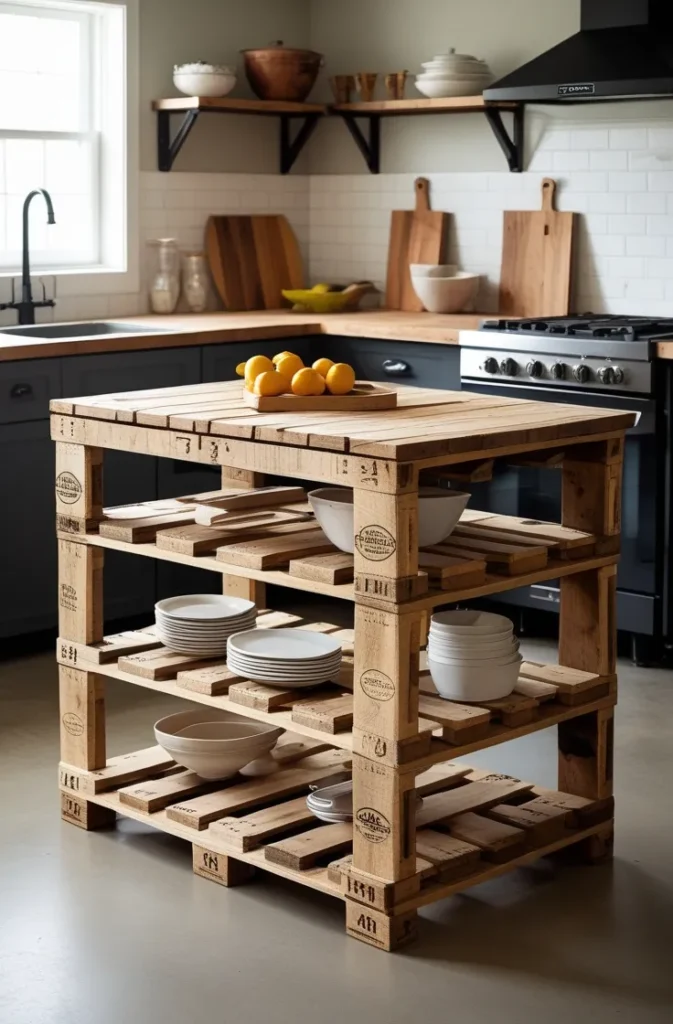
Transform free or low-cost wooden pallets into a rustic and budget-friendly DIY kitchen island that adds industrial charm to your space.
This sustainable project repurposes materials that might otherwise go to waste, creating a unique conversation piece with plenty of functionality. Disassemble pallets carefully, sand thoroughly to remove splinters, then construct a simple island frame with shelving.
Add a countertop of your choice-butcher block works particularly well with the rustic wood-and finish with a food-safe sealer to ensure durability in a kitchen environment.
DIY How to: Disassemble pallets with a pry bar, remove nails, sand all pieces thoroughly, construct a frame with shelving, then add your preferred countertop.
Cost: $50-$200 depending on whether you need to purchase the pallets and your choice of countertop.
Pro Tip: Look for pallets stamped with “HT” (heat-treated) rather than “MB” (methyl bromide) to ensure they’re free from harmful chemicals, and always sand thoroughly to prevent splinters.
13. Appliance-Ready Island with Electrical

Take your DIY kitchen island to the next level by incorporating electrical outlets and space for small appliances. This design creates a dedicated station for your microwave, coffee maker, or stand mixer, freeing up valuable counter space elsewhere in the kitchen.
The built-in electrical components make this a more advanced project, but the convenience of having powered appliances in your island makes it worth the extra effort. Include drawers and cabinets for storing related items, creating efficient workflow zones in your kitchen.
DIY How to: Build a standard island frame and cabinets, work with an electrician to properly install outlets and wiring (permits may be required), create dedicated spaces for specific appliances, then finish with your chosen countertop.
Cost: $800-$1,800 depending on size, materials, and electrical work.
Pro Tip: Consider installing pop-up outlets that recess into the countertop when not in use for a cleaner look, and always hire a licensed electrician for the wiring to ensure safety and code compliance.
14. Sink-Equipped Functional Island
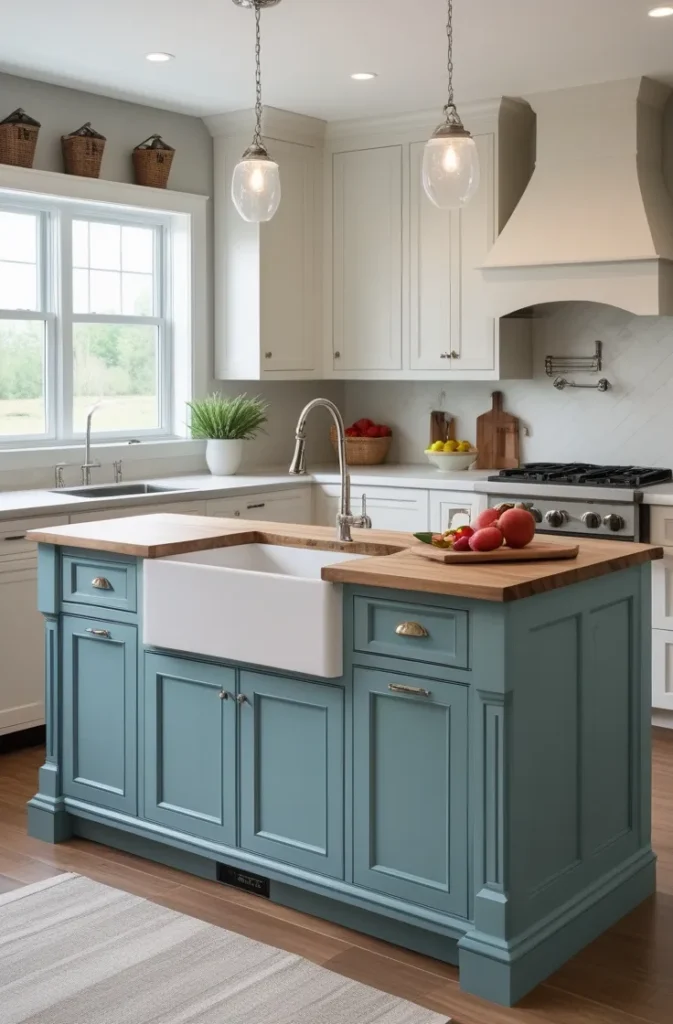
Enhance your kitchen workflow with a DIY kitchen island that incorporates a sink for food preparation and cleanup.
This more complex project requires plumbing considerations but creates a highly functional workspace that can serve as a secondary or primary sink area.
The island design includes cabinets for storing cleaning supplies and plumbing components, while the countertop provides ample space for food prep around the sink. This option is ideal for larger kitchens where you want to create separate zones for cooking and cleanup.
DIY How to: Build a sturdy cabinet base, work with a plumber to properly install water lines and drainage (permits may be required), install the sink, then complete with your chosen countertop cut to accommodate the sink.
Cost: $1,200-$2,500 depending on plumbing requirements, sink quality, and materials.
Pro Tip: Choose a deep sink for your island to minimize splashing, and consider installing a garbage disposal for added convenience-just be sure your plumbing can accommodate it.
15. Multi-Level Work Surface Island
Create a dynamic cooking space with a multi-level DIY kitchen island that separates food preparation from dining or serving areas.
This design features different height surfaces-typically a standard 36″ counter for food prep and a higher 42″ bar for dining or serving.
The varied heights add visual interest while creating distinct functional zones within your island. This approach works particularly well for open-concept kitchens where the island serves as a transition between cooking and living spaces.
DIY How to: Build a base frame with different height sections, construct cabinets to support each level, ensure proper structural support for both surfaces, then install countertops at the different heights.
Cost: $700-$1,500 depending on size, materials, and complexity.
Pro Tip: Use contrasting countertop materials for the different levels to enhance the visual separation-perhaps butcher block for the prep area and stone for the dining surface.
16. Slim Rolling Prep Station
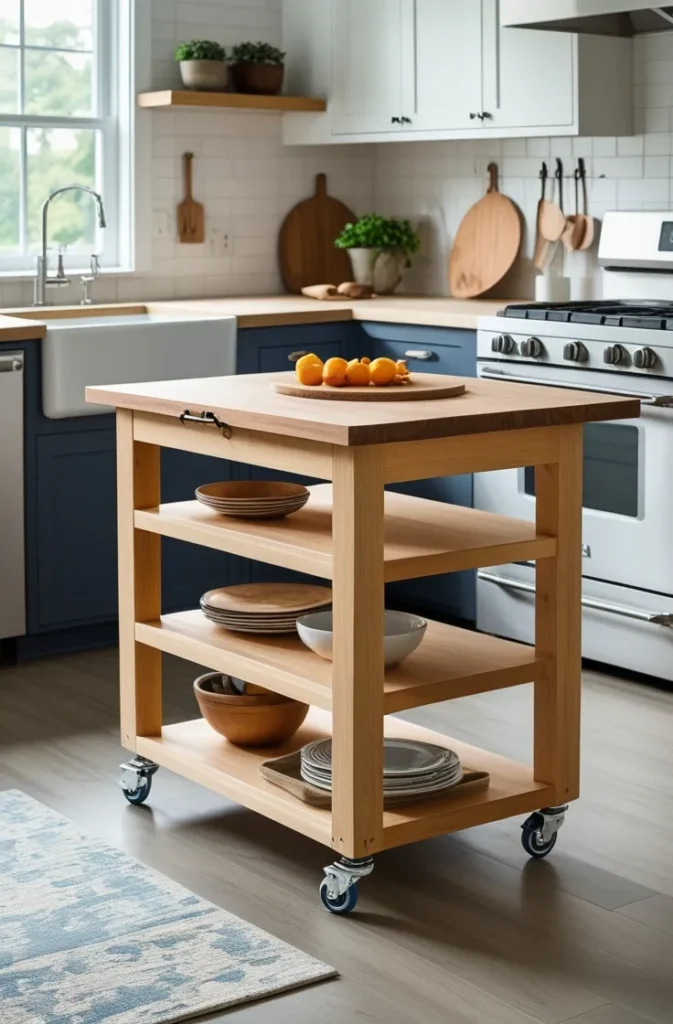
Perfect for narrow kitchens or small spaces, a slim rolling DIY kitchen island provides valuable work surface without overwhelming your kitchen.
At just 12-18″ wide, this narrow island can fit between existing cabinets or against a wall when not in use, then roll out when you need extra prep space.
Include a towel bar on one end, hooks for hanging utensils, and a shelf or two underneath for storing cutting boards or baking sheets. The mobility factor makes this island incredibly versatile, adapting to your changing needs.
DIY How to: Construct a narrow frame with 2x4s, add plywood shelves, attach heavy-duty locking casters, install a towel bar and hooks, then top with your preferred countertop material.
Cost: $150-$300 depending on materials and features.
Pro Tip: Choose a countertop material that matches your existing kitchen counters for a cohesive look, and consider adding a drop-leaf to one side that can be raised when you need extra width.
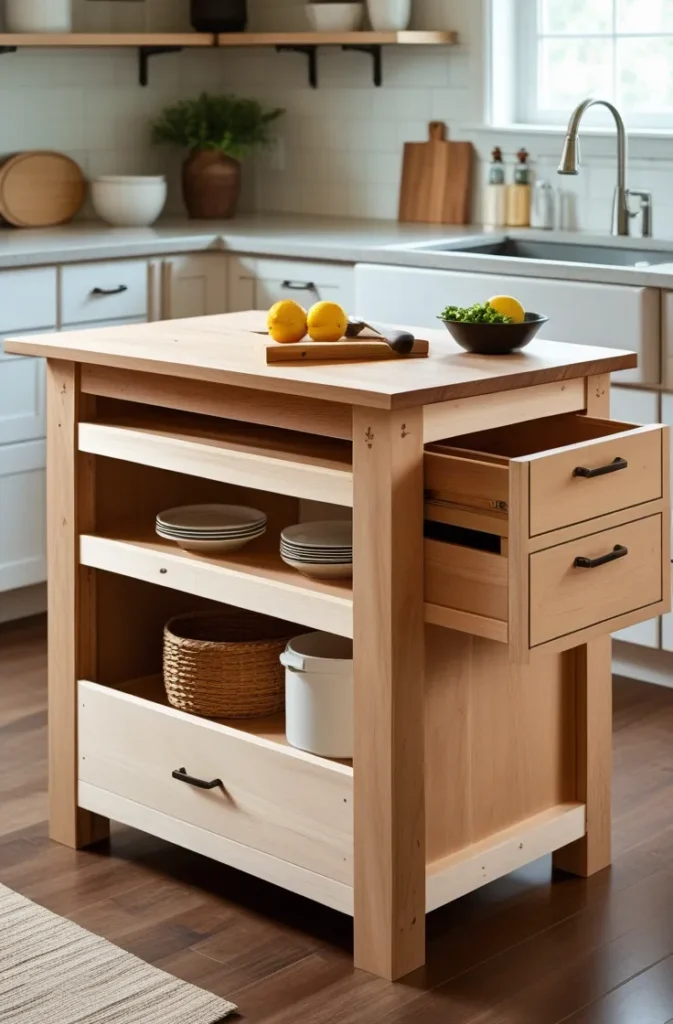
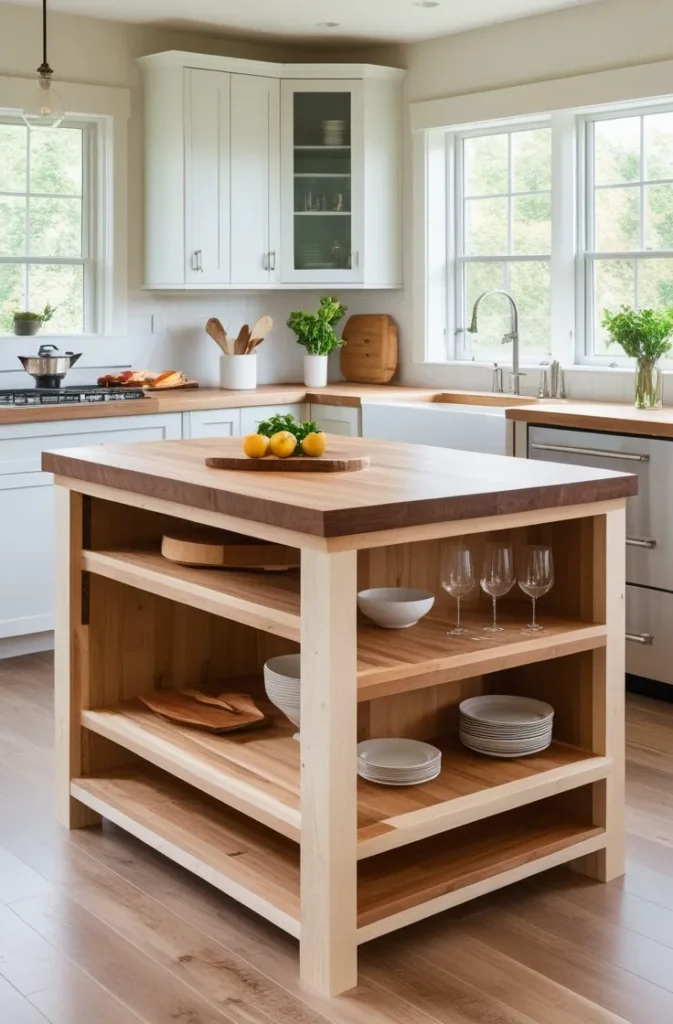
17. Storage-Maximizing Island with Specialized Compartments
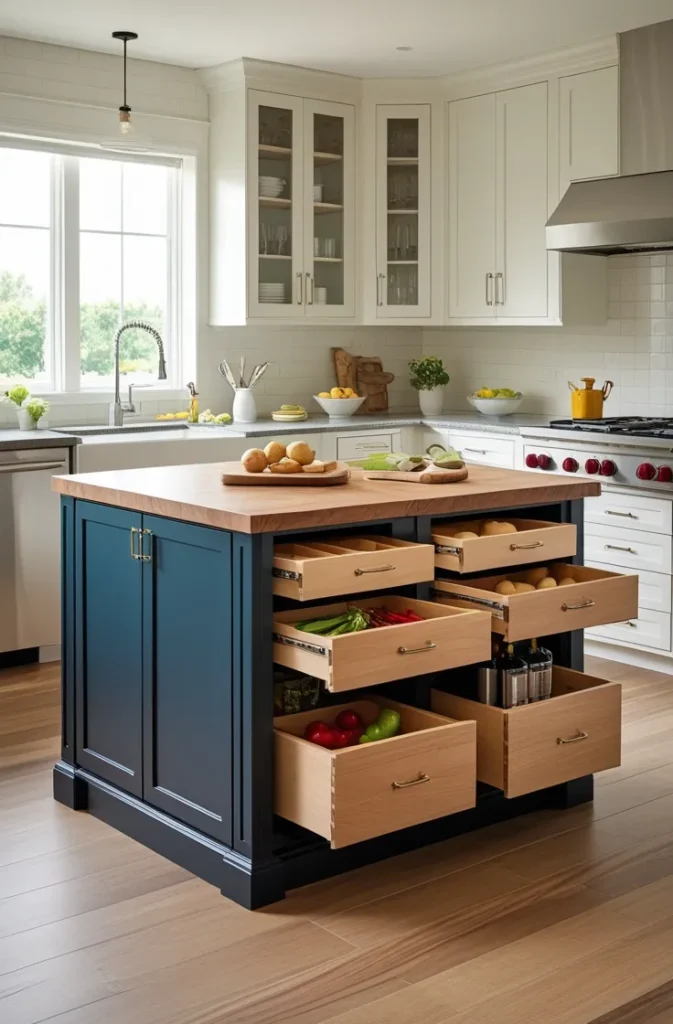
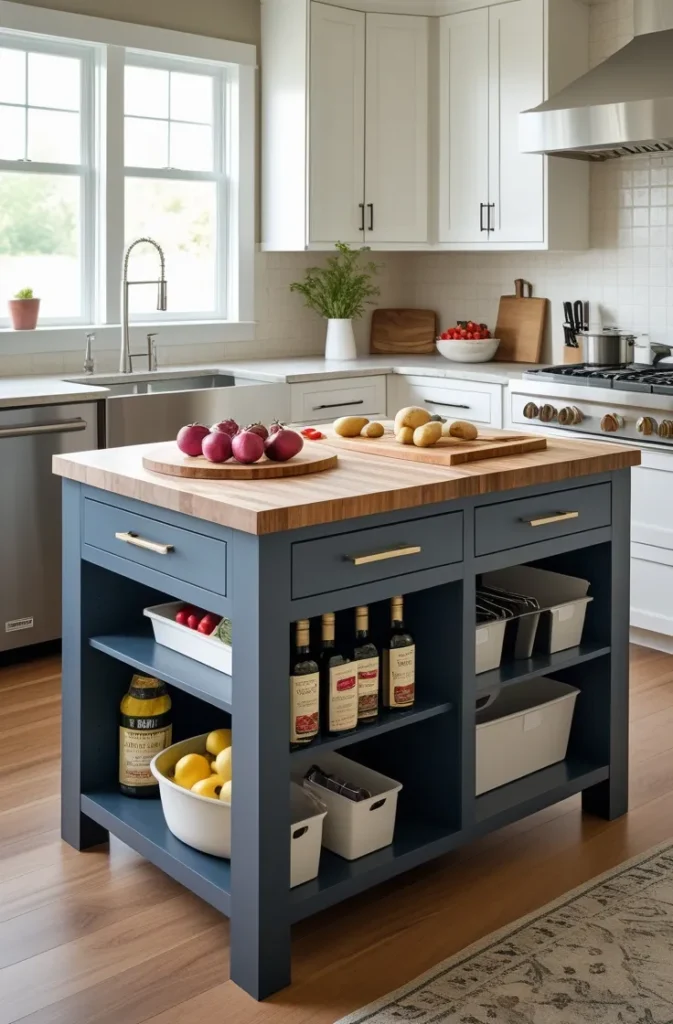
Create the ultimate organization solution with a DIY kitchen island designed to maximize storage through specialized compartments.
This custom approach allows you to create dedicated spaces for everything from wine bottles and spices to baking sheets and cutting boards. Include vertical dividers for storing trays and platters, pull-out bins for potatoes and onions, and specialized drawers for utensils and gadgets.
The thoughtful organization makes cooking more efficient while keeping everything within easy reach.
DIY How to: Design your island with specific storage needs in mind, build a sturdy cabinet base, construct specialized drawers and compartments, install drawer slides and organizers, then top with your preferred countertop.
Cost: $700-$1,500 depending on size, materials, and number of specialized features.
Pro Tip: Before finalizing your design, inventory your kitchen tools and equipment to ensure you’re creating storage solutions for items you actually own and use regularly.
Practical Tips and Tricks for DIY Kitchen Islands
- Measure twice, build once – Always confirm your kitchen measurements before purchasing materials, ensuring your island will fit with proper clearance (36-48″ between island and other counters).
- Consider traffic flow – Place your island where it won’t obstruct the natural path between major kitchen work areas like sink, refrigerator, and stove.
- Match your kitchen style – Choose materials and finishes that complement your existing cabinets and countertops for a cohesive look.
- Plan for utilities early – If you want electricity or plumbing in your island, consult professionals during the planning phase rather than trying to add these features later.
- Use quality hardware – Invest in good-quality drawer slides, hinges, and pulls that will withstand daily use without failing.
- Add finishing touches – Consider decorative elements like corbels, beadboard panels, or contrasting paint colors to elevate your island’s appearance.
- Protect your floors – Use furniture pads under island legs to prevent scratching wood floors, or opt for locking casters for mobility.
FAQ Section
How much does it cost to build a DIY kitchen island?
DIY kitchen islands typically cost between $100-$1,500 depending on size, materials, and features. Simple rolling carts start around $100, while custom built-ins with plumbing or electrical can reach $1,500 or more.
What is the standard size for a kitchen island?
Standard kitchen islands range from 4×2 feet (small) to 10×3.5 feet (large). Medium islands (6.5×3 feet) typically seat two people, while large islands can accommodate up to four chairs.
Do I need special tools to build a kitchen island?
Basic DIY islands require standard tools like a drill, saw, measuring tape, and screwdriver. More complex builds might need specialized tools like a kreg jig, router, or miter saw.
How much space should I leave around my kitchen island?
Allow 36-48 inches between your island and surrounding countertops or appliances to ensure comfortable movement and workflow in your kitchen.
Can I add plumbing or electricity to my DIY island?
Yes, but these features require professional installation and permits. Budget an additional $500-$1,000 for plumbing and $300-$500 for electrical work.
What countertop materials work best for DIY kitchen islands?
Popular options include butcher block (warm, affordable), laminate (budget-friendly), quartz (durable, low-maintenance), and granite (heat-resistant, unique patterns). Choose based on your budget and needs.
How tall should my kitchen island be?
Standard counter height is 36 inches for food preparation. For dining areas, consider 42-inch bar height or 30-inch table height depending on your preferred seating style.
Conclusion
Whether you choose a simple rolling cart or an elaborate custom-built island with all the bells and whistles, your DIY project will add value and personality to your home. By following the ideas, instructions, and tips in this guide, you’ll be well-equipped to create the perfect island for your needs and budget.
Remember to plan carefully, measure accurately, and don’t be afraid to adapt these ideas to suit your unique space. Happy building!